Azure DevOps pipelines UI - why it's bad and how I fixed it.
Azure DevOps pipelines UI is a powerful tool, but it's not perfect. It's slow, clunky, and hard to use. In this post, I'll share my experience with the Azure DevOps pipelines UI, and how I fixed it. I'll show you how I made managing pipelines easier, faster, and more intuitive. I'll also share some tips and tricks for working with Azure DevOps API.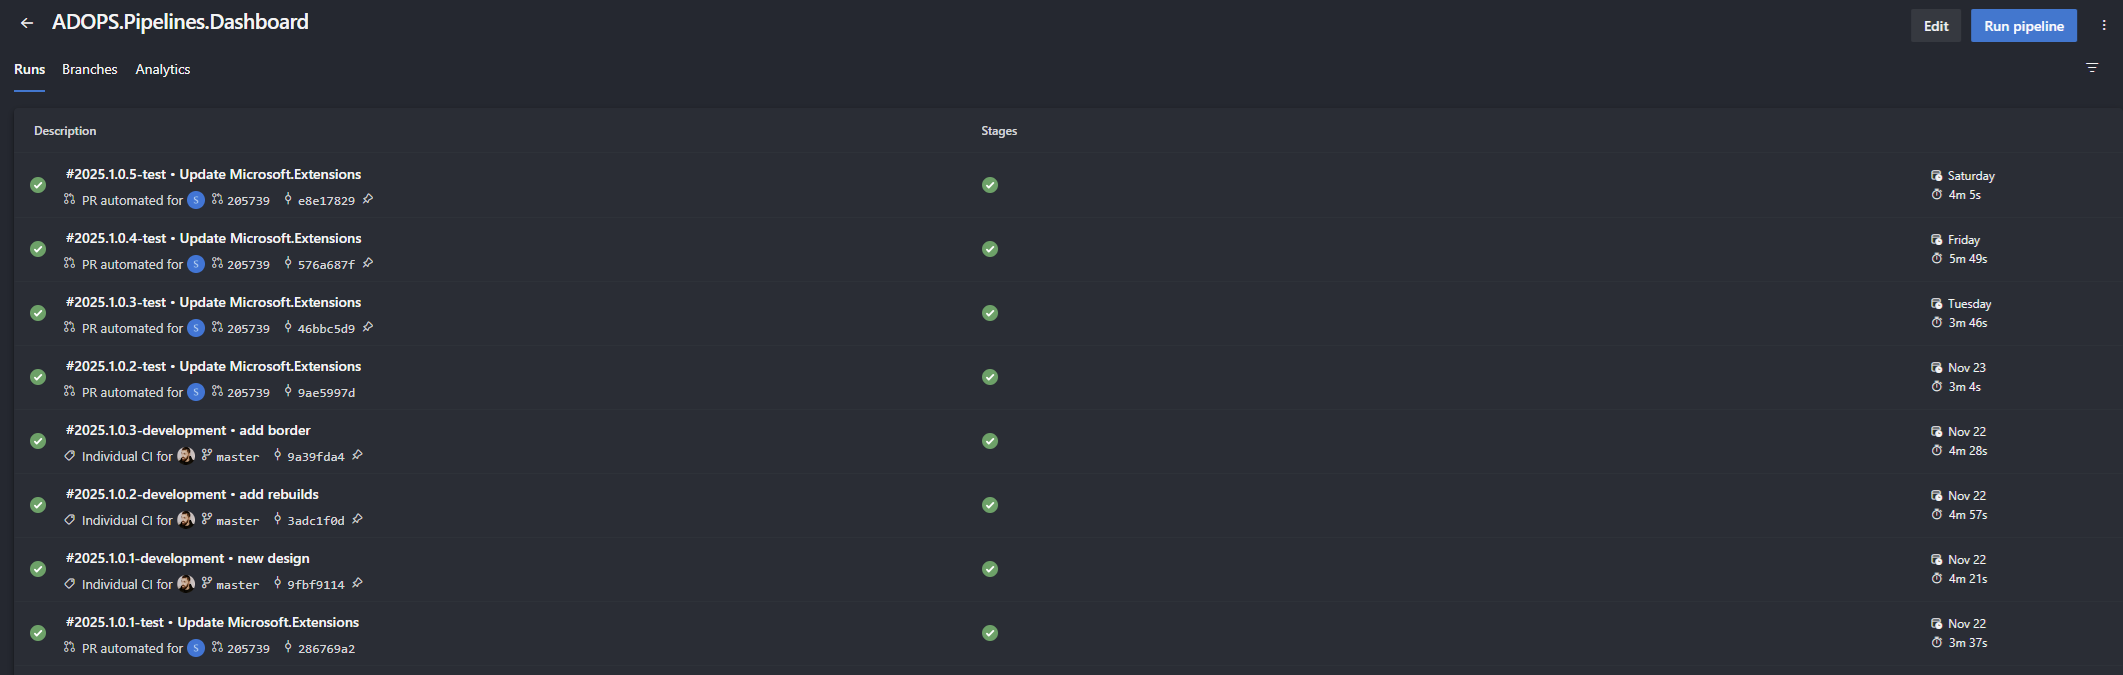
[.Net, AzureDevOps, pipelines, Redis, Blazor]A journey from accepting flaky UI, to creating new one.
Working with default pipelines UI in Azure may lead to some frustrations. Considering you're trying to check how your single pipeline builds, you can go to pipeline page and check  You can filter the runs by branch, but it's not very intuitive. You have to click on the filter icon, then select the branch you want to see. It's not a big deal, but it's not very user-friendly. In multi branch environment it's hard to say whether your branch builds or not. You need to first filter for it to say the status. It's not very convenient, especially when you have many branches and pipelines.
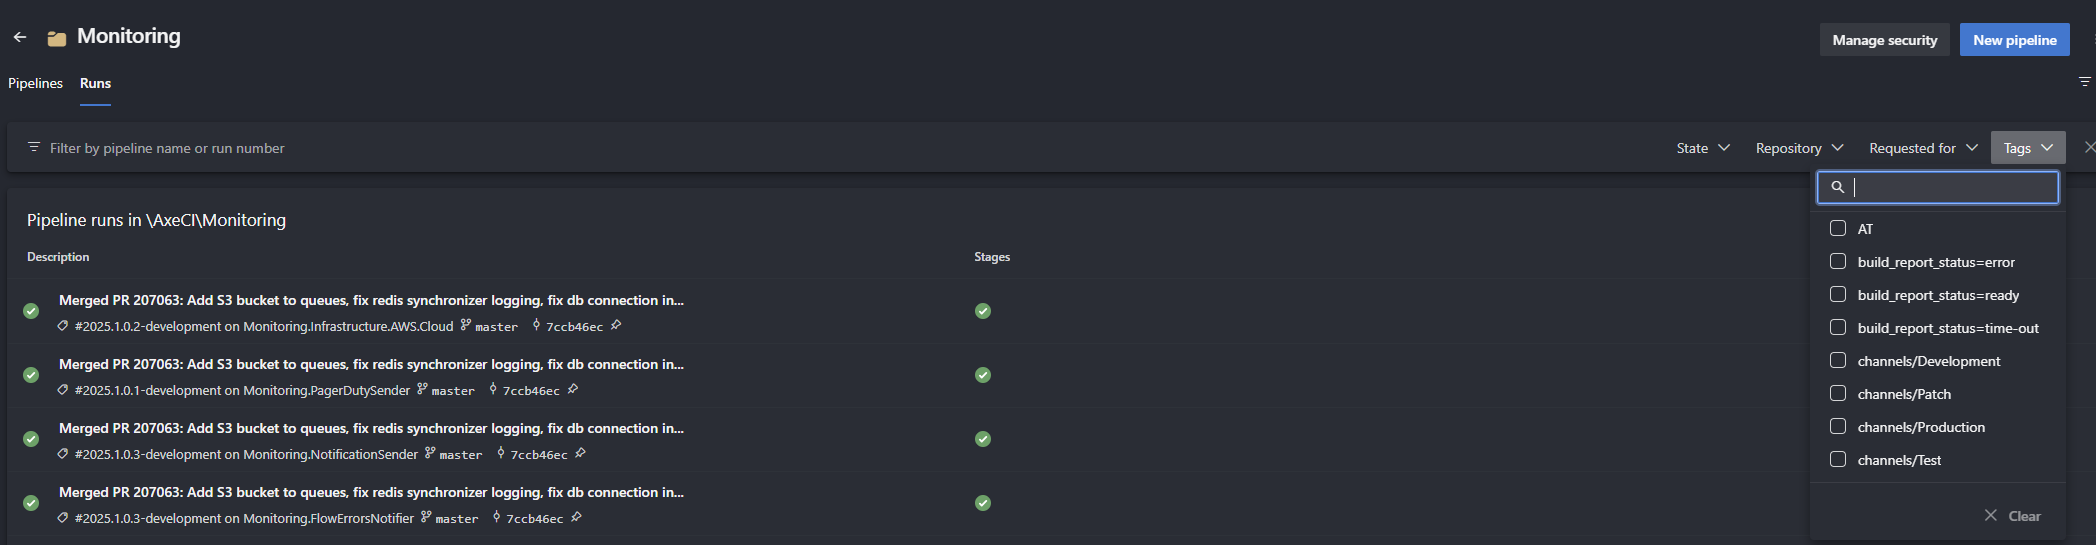
Situation starts to be even more complicated when you go to folder view, you can't see the branch name, just success/fail indication. Here filtering is very limited and allows just to filter by name of the pipeline. When switching to
 When I was trying to find what builds and why were failing in my configuration I had to dig into the pipelines UI a lot wasting my time. Then I decided that I'll make a simple UI for myself that will aggregate builds from my pipelines and show me the status of the builds. At the moment I had about 80 pipelines in about 5 different folders each had multiple branches to monitor.
I've started to play with Azure DevOps API and realized that doing this live will be extremely inefficient and will affect my Azure DevOps instance performance. Therefore I decided to cache pipelines data in
Runs tab. However you may be surprised that you'll not find information on the branch that your pipeline is running on.You can filter the runs by branch, but it's not very intuitive. You have to click on the filter icon, then select the branch you want to see. It's not a big deal, but it's not very user-friendly. In multi branch environment it's hard to say whether your branch builds or not. You need to first filter for it to say the status. It's not very convenient, especially when you have many branches and pipelines.Situation starts to be even more complicated when you go to folder view, you can't see the branch name, just success/fail indication. Here filtering is very limited and allows just to filter by name of the pipeline. When switching to
Runs tab you'll be able to see all pipeline builds from all branches, but filtering is limited to Tags. Tags field does contain branch name, but it's just one of the many possible tags, so you'll be bloated with tons of tags to search in. Plus to see builds from different branches, you'll need to filter multiple times. Filtering will also give you all runs from all pipelines sorted by date, so you'll need to scroll a lot to find the one you're interested in.When I was trying to find what builds and why were failing in my configuration I had to dig into the pipelines UI a lot wasting my time. Then I decided that I'll make a simple UI for myself that will aggregate builds from my pipelines and show me the status of the builds. At the moment I had about 80 pipelines in about 5 different folders each had multiple branches to monitor.I've started to play with Azure DevOps API and realized that doing this live will be extremely inefficient and will affect my Azure DevOps instance performance. Therefore I decided to cache pipelines data in
Redis database to make page snappy and not to overload Azure DevOps API.Azure DevOps dashboard - how it's designed and how it works.
Decision on frontend technology was simple for me. I'm a backend engineer with my frontend experience limited to mostly Asp.Net MVC and Razor pages. Sticking with Microsoft technologies I've decided to go with Blazor. I've heard a lot of good things about it and I wanted to try it out.
Background worker uses AzureDevOps API with Personal Access Token to fetch pipelines data and store it in Redis. All needed annotations are made by background worker and persistently stored in cache. Frontend runs internal process checking for changes in Redis and updates the UI accordingly. The final result is a single data grid with all pipeline folders presented in a single view. There is a grouping of results by 3 branch groups: main/develop/master, patch and release branches. In a single pipeline view there is a distinction on branches too. More details are available in Azure DevOps UI, so I don't need to fetch everything into the application.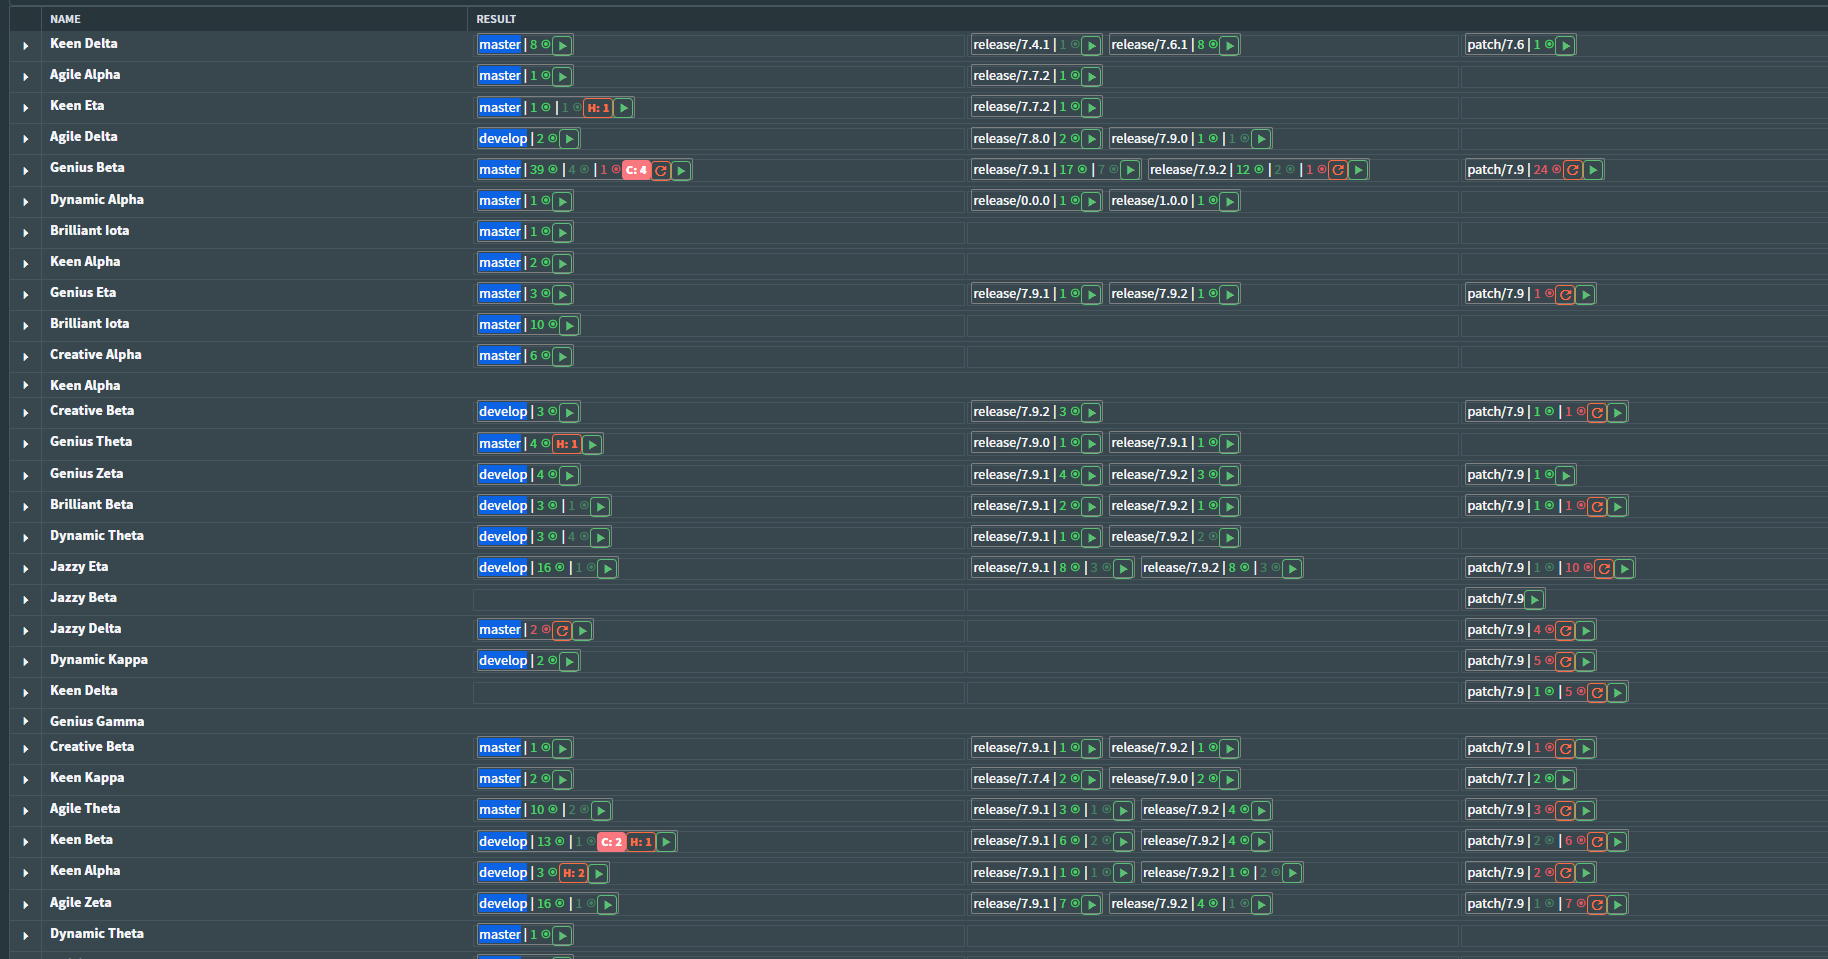

+------------------+       +------------------+
| Background Worker|       | Azure DevOps API |
|                  |<----->|                  |
+------------------+       +------------------+
|
|
↓
+------------------+
|      Redis       |
|                  |
+------------------+
↑
|
|
+------------------+
|     Frontend     |
|     (Blazor)     |
+------------------+
Background worker uses AzureDevOps API with Personal Access Token to fetch pipelines data and store it in Redis. All needed annotations are made by background worker and persistently stored in cache. Frontend runs internal process checking for changes in Redis and updates the UI accordingly. The final result is a single data grid with all pipeline folders presented in a single view. There is a grouping of results by 3 branch groups: main/develop/master, patch and release branches. In a single pipeline view there is a distinction on branches too. More details are available in Azure DevOps UI, so I don't need to fetch everything into the application.
The code.
First we need to get PAT from Azure DevOps to be able to access the API. You can do it from your Azure DevOps instance.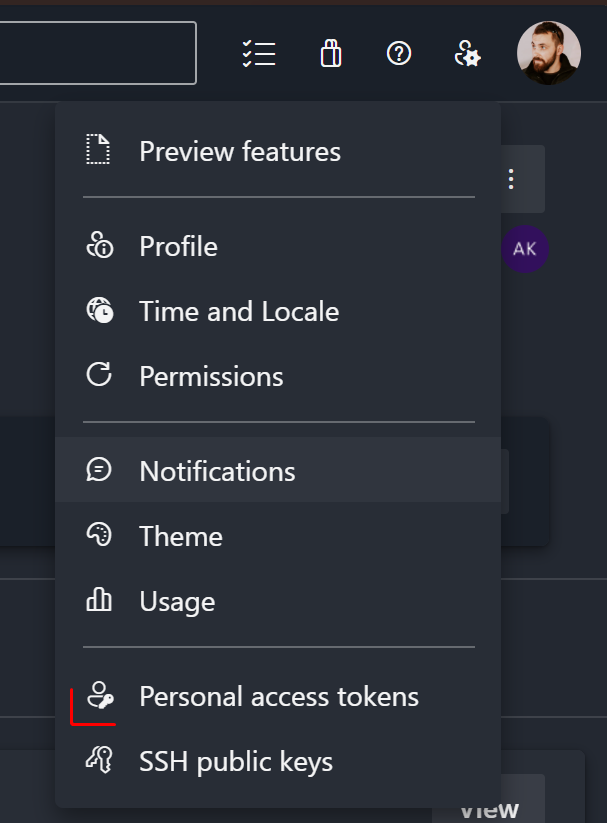 Having PAT we can start to play with Azure DevOps API. Generally you want to grant as little permissions as you possibly can. When you have set up your PAT you can start using it in your application. Before we start you'll need to install nuget packages in your application:Next step will be creating Azure DevOps HttpClients:To be able to get pipelines you might use just BuildHttpClient, but to be able to fetch additional information you'll need to use GitHttpClient and TaskAgentHttpClient.
Based on the results from this method we can fetch branches. If there is no LatestBuild it means that this project was never built and does not interest us at the moment. Having LatestBuild in place we can run this code:Now having builds and branches we can fetch more information, to be able to properly filter changes that actually triggered the build, we need first to check what are include paths for the pipeline. Having that we'll be able to check changes between revisions and decide which ones actually triggered the change.If we're talking about changes themselves we need to fetch them from the repository. This is a bit more tricky as we need to fetchLast but not least, we need to fetch builds from agent queue. We do have only a single build agent pool (with multiple build agents) so it isn't particularly hard to fetch the queue position for the builds.Having all of that data we can now present it in a nice and clean way. I've used Blazor with Radzen for that, but you can use any other frontend technology you like. The most important thing here is to have a good strategy for...
Having PAT we can start to play with Azure DevOps API. Generally you want to grant as little permissions as you possibly can. When you have set up your PAT you can start using it in your application. Before we start you'll need to install nuget packages in your application:1<PackageReference Include="Microsoft.TeamFoundation.DistributedTask.WebApi" />2<PackageReference Include="Microsoft.TeamFoundationServer.Client" />
1var connection = new VssConnection(2new Uri(_adopsEndpoint),3new VssBasicCredential(string.Empty, _adopsPAT));4using var buildClient =5connection.GetClient<BuildHttpClient>();6using var gitClient =7connection.GetClient<GitHttpClient>();8using var taskClient =9connection.GetClient<TaskAgentHttpClient>();
BuildHttpClient- to get pipelines data.GitHttpClient- to be able to fetch information on changes and branches.TaskAgentHttpClient- to be able to fetch queue position for the builds.
await buildClient.GetFullDefinitionsAsync(project: appConfiguration.Value.ProjectName, includeLatestBuilds: true); - this will give you all pipelines in the project with latest builds.Based on the results from this method we can fetch branches. If there is no LatestBuild it means that this project was never built and does not interest us at the moment. Having LatestBuild in place we can run this code:
await buildHttpClient.ListBranchesAsync(projectName, "TfsGit", repository: buildDefinitionReference.LatestBuild.Repository.Id). It will result in a list of all branches in the repository, so we can filter out the ones that are not interesting for us.1var allPipelineIds = new []; //here you'll need to put all pipeline ids you're interested in2var branches = new []; //here you'll need to put all branches you're interested in3List<Build>[] buildsResults = [];4if (buildDefinitionReference != null)5{6var buildTasks = branches.Select(branch => buildClient.GetBuildsAsync(7definitions: allPipelineIds,8branchName: branch,9project: projectId10)).ToList();11buildsResults = await Task.WhenAll(buildTasks);12}
1public async Task<List<string>> GetPathsForPipeline(BuildDefinition pipeline, GitHttpClient gitClient, string projectName)2{3if (pipeline.Process is YamlProcess process)4{5var yamlFileName = process.YamlFilename;6var yamlFile = await gitClient.GetItemTextAsync(pipeline.Repository.Id, yamlFileName, null, VersionControlRecursionType.None);7var reader = new StreamReader(yamlFile);8var result = await reader.ReadToEndAsync();910//this is from YamlDotNet package11var deserializer = new DeserializerBuilder()12.WithNamingConvention(UnderscoredNamingConvention.Instance).IgnoreUnmatchedProperties()13.Build();14var res = deserializer.Deserialize<YamlModel>(result);15return res.Trigger.Paths.Include;16}1718return [];19}
1private async Task<List<FileChange>> GetChangesBetweenBuilds(BuildHttpClient buildClient, string projectName, GitHttpClient gitClient,2List<Build> lastBuilds, Build buildLastFinished)3{4var fileChangesBetweenBuilds = new List<FileChange>();5var previousBuild = lastBuilds.FirstOrDefault(x => x.BuildNumber != buildLastFinished.BuildNumber && x.FinishTime != null);6if (previousBuild != null && previousBuild.BuildNumber != buildLastFinished.BuildNumber)7{8var changes = await buildClient.GetChangesBetweenBuildsAsync(projectName, previousBuild.Id, buildLastFinished.Id);9lastBuildModel.Changes = changes.Select(x => new ChangeModel(x)).ToList();10foreach (var change in lastBuildModel.Changes)11{12var res = await gitClient.GetCommitAsync(projectName, change.Id, buildLastFinished.Repository.Id);13var ch = await gitClient.GetChangesAsync(projectName, res.CommitId, buildLastFinished.Repository.Id).Changes;14if (ch != null)15{16var filechanges = ch.Where(x => x.Item.IsFolder == false).ToList();17fileChangesBetweenBuilds.AddRange(GetFileChanges(filechanges, buildModel.IncludePaths).ToList(););18}19}20}21return fileChangesBetweenBuilds;22}2324public static IEnumerable<FileChange> GetFileChanges(this List<GitChange> fileChanges, List<string> includePaths)25{26foreach (var change in fileChanges)27{28if (includePaths.Any(x => IsMatch(change.Item.Path, x)))29{30yield return new FileChange()31{32FileName = change.Item.Path,33ChangeType = change.ChangeType,34Url = change.Url35};36}37}38}
1var queue = await taskAgentClient.GetAgentRequestsForQueueAsync(projectName, agentPoolId, 1000);2var notDone = queue.Where(x => x.Result == null).ToList();3var notStarted = queue.Where(x => x.Result == null && x.AssignTime==null).ToList();45return notDone.Select(x => new QueueEntry()6{7Name = x.Definition?.Name??"",8QueueTime = x.QueueTime,9StartTime = x.AssignTime,10Status = x.AssignTime!=null?QueueStatus.InProgress:QueueStatus.Queued,11Position = x.AssignTime==null? notStarted.IndexOf(x) + 1: 0,12BuildId = x.Owner.Id,13PipelineId = x.Definition?.Id14}).ToList();
The cache.
Running all queries live would very quickly lead to hitting Azure DevOps API rate limits. Therefore I've decided to use
Redis for caching here. I've created a background worker that runs every N seconds and fetches all pipelines from Azure DevOps API and if there are any new pipelines or builds it updates the cache. I'm caching commit details, changes between builds and any other data that won't change for 2 weeks, so I won't be running heavy queries for them. On the other hand, I'm caching branches with lower TTL, so I can quickly see if there are any new branches. Queue details are not cached at all as this is very frequently changing data.Conclusion.
It's not always the best strategy to code everything by yourself, but when available tools are not enough, you as an engineer should be able to create your own. You'll have opportunity to learn new things and create software tailored to your needs. I find this journey very rewarding and I'm happy with the results. I got some feedback from my colleagues and they're happy with the results and they're using it daily.